Tektronix 2230 Digital storage oscilloscope
Introduction
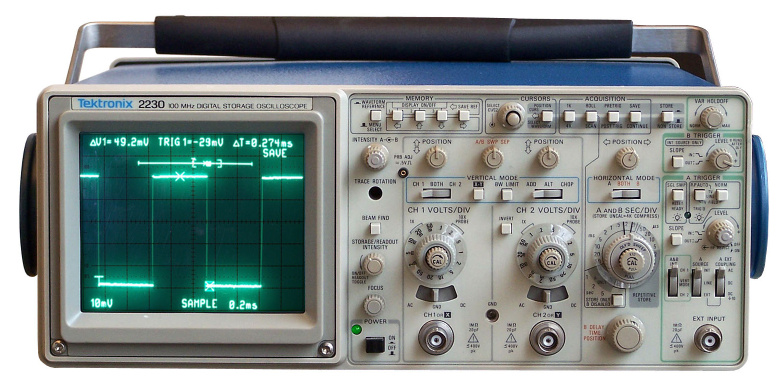
On my home workshop I use old but great Tektronix 2230 storage scope for measuring electronic DYI hobby projects. On this page I collect some tips for it's advanced use cases.
Using delayed B Time Base
Delayed B Time Base act as zoom-in tool. It allow look at part of trace more detailed. To use this feature, do following steps:
- Obtain trace on display. Switch HORIZONTAL MODE control to BOTH position
- Set B TRIGGER LEVEL knob to fully clock-wise position, marked as B RUNS AFTER DLY
- When second trace appear on display, move first trace up and use A/B SWEEP SEP control to space both traces verticaly
- Now pull B SEC/DIV knob and rotate right. You may see B SEC/DIV info at right-bottom display
- Use B DELAY TIME POSITION knob to move highlighted area on first line to select what trace portion is displayed at second trace. Delay time is displayed on top-center portion of display
| Step 1 | Step 2 |
|---|---|

|

|
 1. - Setting Horizontal mode |

 2. - Setting B trigger level, 3. - Setting A/B Sweep trace separation |
| Step 3 | Step 4 |

|

|
| 4. - Switching B Time Base control |
 5. - Setting B delay time position
|
Saving Reference waveforms
In storage mode, up to three waveforms can be saved to memory to compare them with actual trace.
Storage mode controls

On image above, you see Storage control buttons - it's have two modes: In MENU mode they are used for walking through menu structure (bottom arrows). In WAVEFORM REFERENCE mode the MEMORY buttons select memory 1 - 3 and SAVE REF button is used for storing Waveform Reference to memory.

On image above, you see second part of Storage controls - Cursors selection knob and button for changing it's mode and ACQUISITION control buttons.
Save waveforms to memory
- Obtain trace on display. Set STORE mode
- Press SAVE REF button, on display is choose memory 1 - 3
- Press MEMORY 1 button, trace is saved to memory 1 and on display is now original trace A and stored trace
| Save Waveform to memory 1 | ||
|---|---|---|

|

|

|
| 1. - Waveform in store MODE | 2. - Choosing memory to store | 3. - Stored waveform 1 and trace A |
Repeat those steps to save waveforms to memories 2 and 3:
| Save Waveform to memory 2 | ||
|---|---|---|

|

|

|
| 1. - Waveform in store MODE | 2. - Choosing memory to store | 3. - Stored waveform 1 and 2 and trace A |
| Save Waveform to memory 3 | ||

|

|

|
| 1. - Waveform in store MODE | 2. - Choosing memory to store | 3. - Stored waveform 1, 2, 3 and trace A |
Working with Reference waveforms
Reference waveforms can be turned on/off using DISPLAY ON/OFF buttons 1 - 3. When you need move cursor to another waveform, press SELECT WAVEFORM button and use cursor selection knob. Waveform with cursors is underscored on display:
| Using SELECT WAVEFORM MODE to position cursor to the desired waveform | ||
|---|---|---|

|

|
|
| Cursors placed on REF waveform 1 | Cursors placed on waveform A | |
Managing Reference waveforms
Waveforms in memories 1 - 3 are losted, when scope is turned OFF. So on menu is simple manager, that allow to store REF waveforms to NVRAM - there are 26 positions labeled A - Z.
Also is possible to delete or protect memory positions. Free memory is displayed as 0, full as 1. Use cursor selection knob to walk through memory positions and button on knob to confirm operation.
| Managing waveforms in MENU mode, Delete, Lock/Unlock | ||
|---|---|---|

|

|

|
| ADVANCED FUNCTIONS - REFERENCE | Delete waveform | Lock/Unlock waveform |
| Copy waveform | ||

|

|

|
| Copy selected waveform - select source | Copy selected waveform - select destination | Copy selected waveform - copy |
Save waveform to memory in 4k mode
In 4k acquisition mode, a choice may be made to save the entire 4k acquisition or the 1k display window. To save 4k acquisition, press SAVE REF, then press DISPLAY ON/OFF 1twice.
| Save 4k Waveform to memory 1-3 | ||
|---|---|---|

|

|

|
| 1. - Waveform in store MODE | 2. - Choosing memory to store - press DISPLAY ON/OFF 1 twice | |
Working with Reference 4k waveform
Working with Reference 4k waveform is similar as in 1k mode: you can turn waveform OF/ON or move cursors between A and 1:4k waveform
| Using SELECT WAVEFORM MODE to position cursor to the desired waveform | |
|---|---|

|

|
| Cursors placed on REF waveform 1:4k | Cursors placed on waveform A |
To save only the 1k displayed window, press SAVE REF, then press DISPLAY ON/OFF 1 and then DISPLAY ON/OFF 2.
| Save Waveform to memory 1 | ||
|---|---|---|

|

|
|
| 1. - Choosing memory to store - press DISPLAY ON/OFF 1 and then DISPLAY ON/OFF 2 | Displayed 1k waveform | |
Capacitance and Inductance Measurements Using an Oscilloscope and a Function Generator - Sine wave method
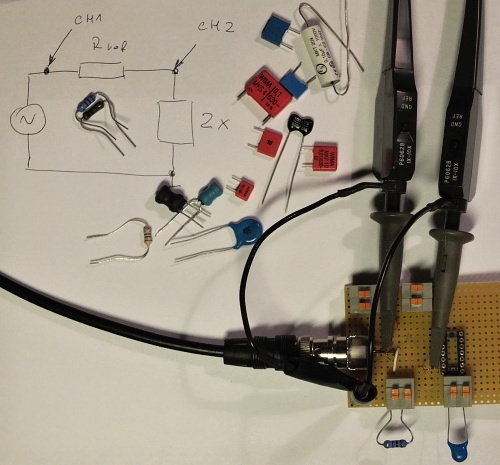
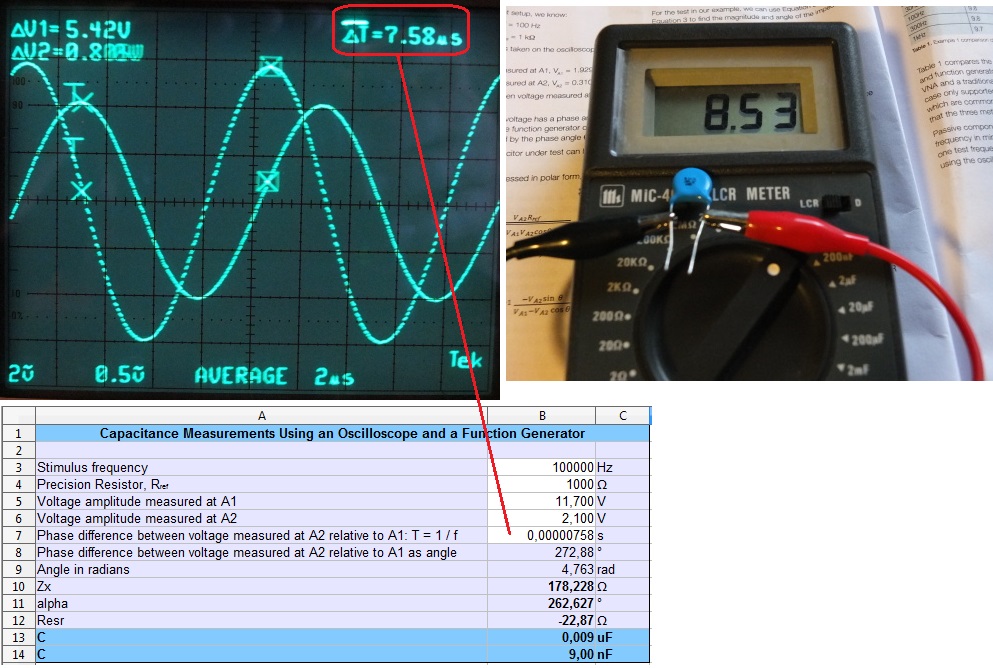
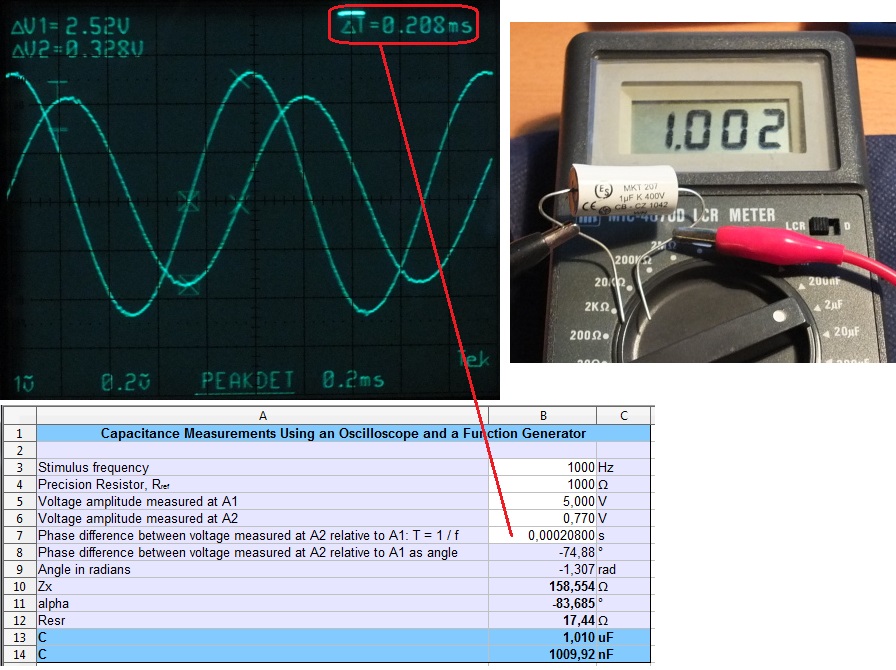
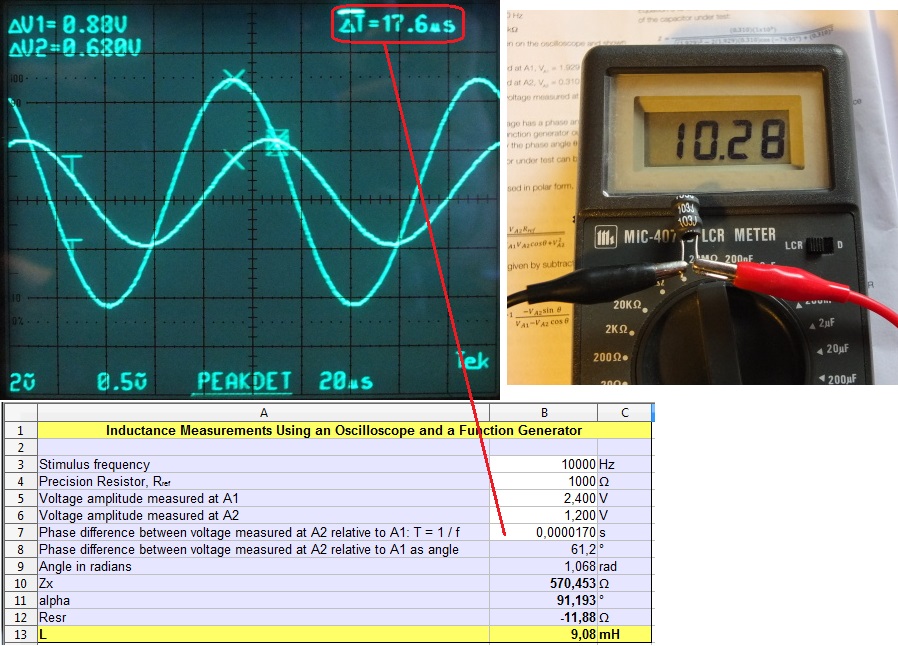
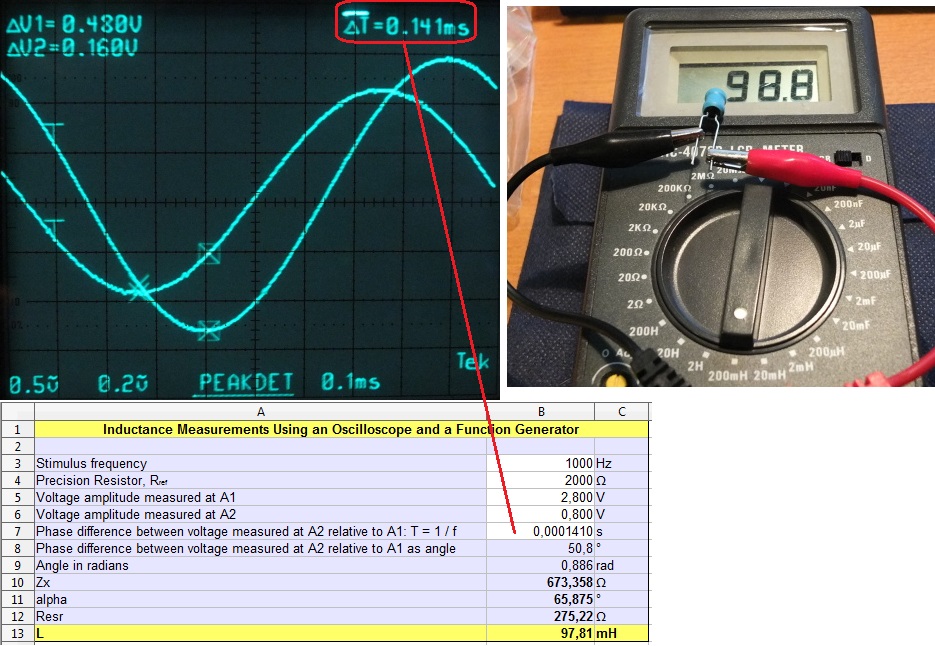
Tektronix published Application note, that describes, how to measure L and C Using an Oscilloscope and a Function Generator. I tried this method for measuring some inductors and capacitors. Some ugly math equations I put to spreadsheet for fast computing.
Capacitance Measurement - 10nF
Capacitance Measurement - 1µF
Inductance Measurement - 10 mH
Inductance Measurement - 100 mH
Capacitance and Inductance Measurements Using an Oscilloscope and a Function Generator - Square wave method
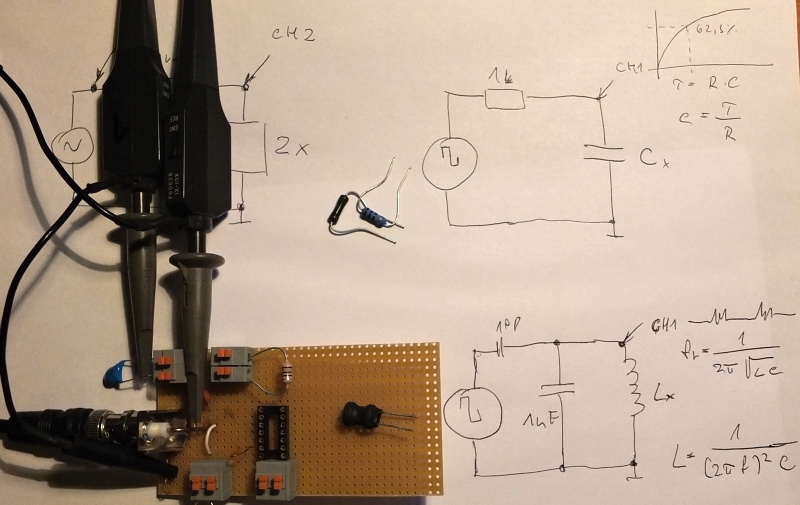
On this video is described another method for for measuring inductors and capacitors.
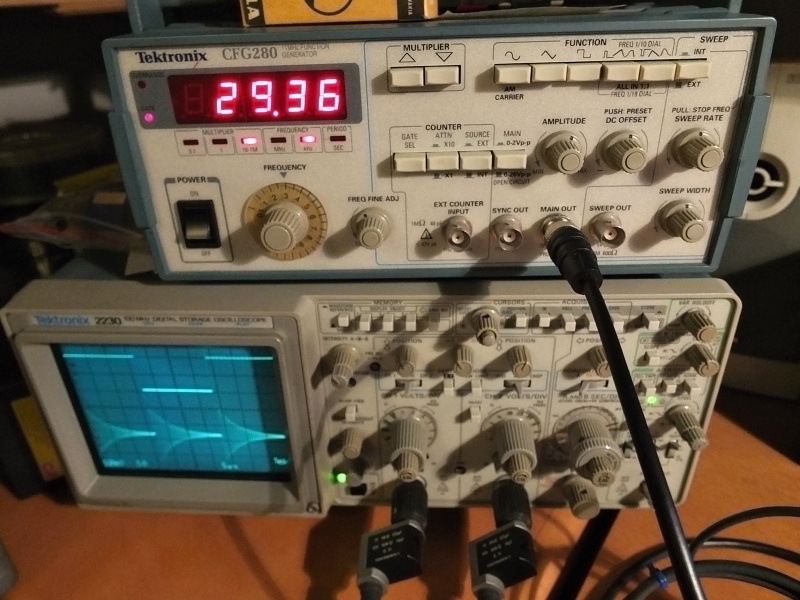
Capacitance Measurement - 1nF
| Measuring capacitance | |
|---|---|

|

|

|

|
C = t/R = 1.29µs / 1000 Ω = 1.29nF. Fixture parasitic capacity is 0,18 nF, so real capacitance is 1.1nF
Inductance Measurement - 10µH
| Measuring Inductance | |
|---|---|

|

|

|

|
L = 1 / (2π * f) 2 * C = 1 / (2π * 1.448 MHz) 2 * 10 nF = 11.4 µH
Tektronix P6022 current probes with type 134 amplifier

The P6022 is a 6 A AC Current Probe with termination provide versatile AC current measurements. It provide accurate current measurements over a wide range of frequencies. The probe allow current measurements without breaking the circuit by clipping onto the current carrying conductor. Shielded probe heads are not grounded when the slides are in their open positions, eliminating accidental grounding of the circuit under test. Passive termination output is switchable between 1 mA/mV and 10 mA/mV.
- 935 Hz to 120 MHz
- 4 A RMS, 100 A peak, 1 mA sensitivity
The P6022 has two sensitivity ranges. One is 1 mA/mV, where it works from 8.5 kHz to 1 Mhz.
The second is 10 mA/mV, where it works from 935 Hz to 120 MHz. More informations about it you can
read here
The Tektronix 134 current probe amplifier interfaces a P6019, P6020, P6021 or P6022 current probe to the voltage input of an oscilloscope. Specifications:
- Current range 1 mA/div to 1 A/div in 1-2-5 sequence (scope at 50 mV/div)
- Gain 50 or 125 (selectable)
- Bandwidth 8 Hz to 54 MHz @ Gain 50, 10 Hz to 30 MHz @ Gain 125
Measuring current with passive terminator

P6022 passive terminator |

|
Passive terminator is set to 10 mA/mV, on scope is measured 27.8 mV so current is 278 mAp-p.
Measuring current with current probe amplifier

Current probe amplifier |

|
Values on CURRENT/DIV knob on amplifier are valid for scope deflection factor 50 mV/div. Whe we use different factor, we must compute scaling factor, in our case: 0.1 V/div / 50 mV/div = 2.
Current probe amplifier is set to 20 mA/div, on scope I measured 6,98 div, so 20 * 6.98 * 2 = 279 mAp-p [mA/div, div, scaling factor].
Tektronix logo and wizard image
With old sysrom version, you can see in menu chooses to display nice Tektronix logo and wizard image. On new (I have 14) versions this option is missing.
| Tek logo and wizard | ||
|---|---|---|

|

|
|